*Note if you have a 2011 or newer, we have found there is a little more work to be done as Subaru has dropped a couple unused wires from the passenger door harness. Details below.
Background: almost every car in Japan has power folding mirrors. Most people in Japan live within the vicinity of Tokyo. Due to population density, space in general is at a premium, if you have been there you can see the space most people have to park their car, whether at home or on a public street, is such that the difference between folded mirrors and not folded makes the difference between fitting in a spot, or not being able to fit in a spot. It is not a luxury feature, but more of a necessity. In the US parking spots, streets, driveways etc. are wider. Power folding mirrors are a feature of some luxury models, but most cars don't have them or need them. In the case one might need to fold their mirrors, it can be done manually. This mod is just a novelty to gain a feature of the JDM Impreza that is rather unique here in the US.
This is a spin off of adding the STI Signal Mirrors as we have learned a ton about the mirrors in general. There are other tasks that one might want to take on, such as adding heated glass, but I'd like to keep this thread about the JDM power folding swap. It might be more of a "guide" than a straight DIY because the mirror parts are interchangeable in a few ways. There is more than one way to do this, for example I am swapping the power folding units from late JDM BP/BL (08-09 style) Legacy mirrors on to my Impreza.
Parts Needed:
- 1 set (L/R) of JDM GR/GH/GE/GV (08+) Impreza power folding mirrors
- OR 1 set (L/R) of JDM BP/BL (08-09) Legacy power folding mirrors
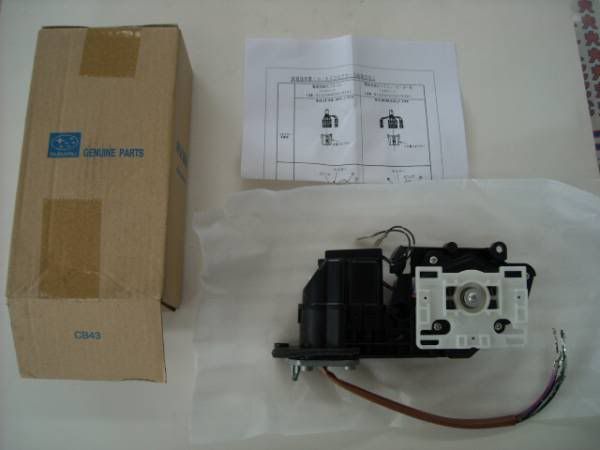
- OR 1 set (L/R) of JDM Subaru OEM "Mirror Repair Kit" for heated/folding/signal mirrors, Subaru JDM OEM p/n's 91029AG022 and 91029AG032.
- 1 JDM OEM mirror switch, with the power folding button. (p/n 83061SA000)

- 1 mirror switch harness clip from a junkyard car that has the same switch as the Impreza
*need pics for this*
The Challenge:
There are 7 components to the mirror we will break down here, which we will refer to as the base, housing, power unit, glass, cap, trim and signal unit
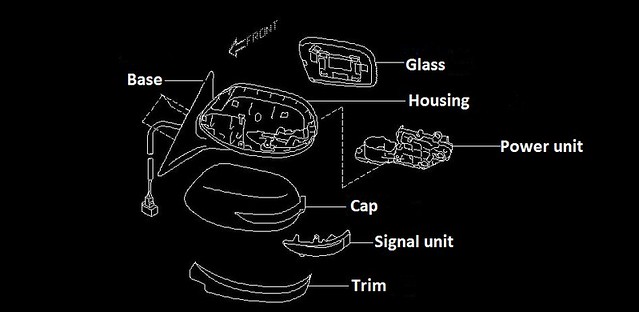
What we want to do, is swap the power unit from the JDM mirrors, into the USDM mirrors. This part is a direct swap, and there are no pertinent differences in the JDM power unit, other than the folding motor, that are specific to LHD and RHD models. The same is not true of all of the other parts though:
base: same USDM as JDM, you can use either when you do your swap. If you have Legacy mirrors, the bases will not work, use the Impreza bases from your stock mirrors.
cap: same USDM as JDM, you can use either when you do your swap (accounting for signal vs. non-signal of course)
trim: Same USDM as JDM.
glass: not the same USDM as JDM. JDM mirrors have a wide angle glass on the Left mirror, as it is the passenger side, and also wide angle glass on the Right side for the driver, must be what the JDM peoples are used to. USDM cars generally have regular glass on the driver's side and wide angle glass on the pasengers side (with the usual "objects in mirror..." warning). You could use the JDM glass on your right hand mirror, for the wide angle effect without the American style warning. I am thinking of trying out a wide angle driver's side mirror like the Japanese have, you can swap the glass in about 1 minute. At any rate, just be aware they are different.
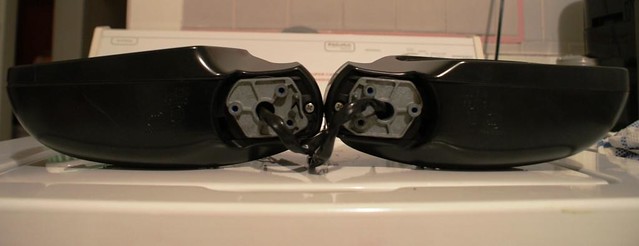
housing: not the same USDM as JDM, the housings are slightly different for LHD vs. RHD so that the mirror generally lines with with the trim edge of the mirror when adjusted for the driver. See below, a comparison of the Left and Right housings on my UDSM mirrors. You can see the housing is slightly different. JDM mirrors are the opposite.
Procedure:
Task 1 - Swap the power units from JDM to USDM mirrors. This is assuming you bought a mirror with all the same options that you have in your current mirrors (i.e. heat and signal if you have that)
-Remove glass from the mirror. You will need to release a couple clips, the lower 2 as pictured below. If your mirror is still on the car, you can adjust it all the way up to get in there. If it is off the car, just push it up, don't worry the motors are designed to put up with some amount of "pushing" without damaging the adjuster, though it will sound bad to you. If you have heated mirrors, you will need to pull the 2 wires off the heating terminals to remove the glass.
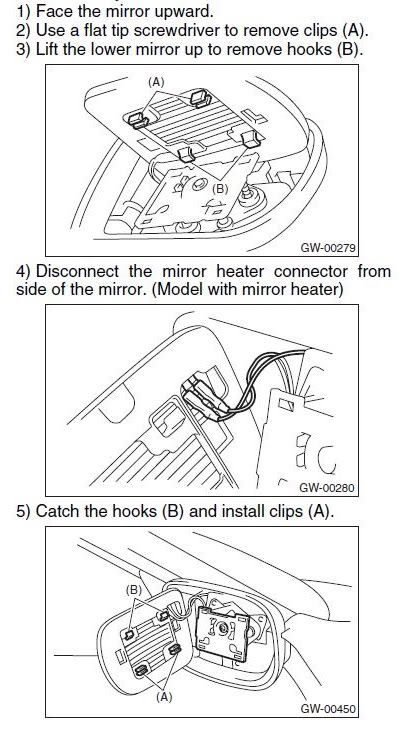
- Release the mirror cap
Once you take off the glass, you will see three of the clips you can release, using a flat blade screw driver. This will lift the mirror cap up enough you can snap it off. There are more than the 3 clips that you can't get to,so be careful snapping it out.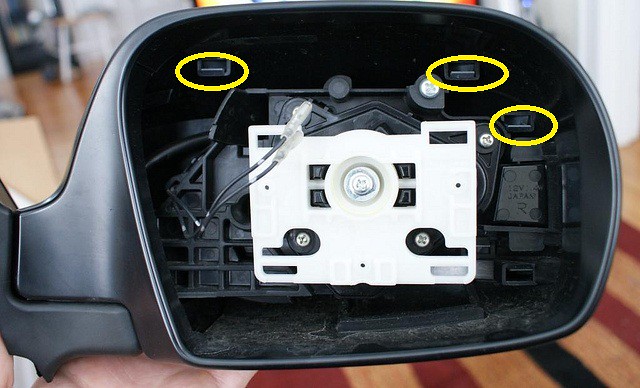
- Remove the signal unit (if applicable)
The kick panel is also held in by a tab under the sill trim, you will need to pull up the frontward snap of the sill trim to get the kick panel out.
Now you can get to the door plug/dash harness junction. It is behind where the kick panel was, held tight by a clip. you can slide the door plug down and of the clip holding it. It is easier to disconnect when you pull it off the clip. The lower plug is the door side, shown here: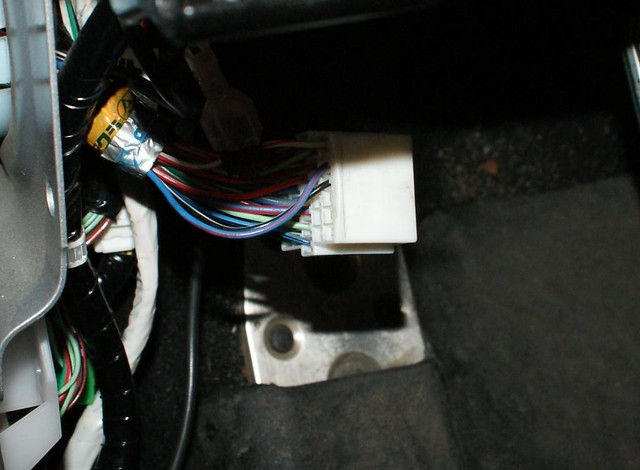
You can see the two wires you want to tap into in this pic, the blue w/red stripe, and the black w/white.
The basics of what you want to do here:
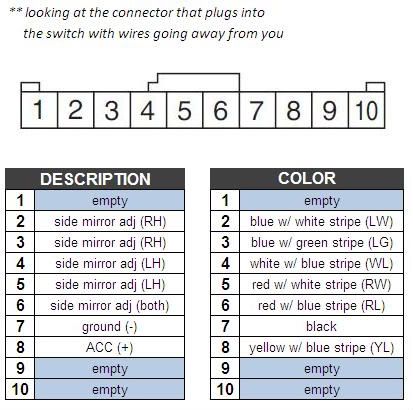
Join the blue/red wires in both door harnesses to pin 10 on the JDM mirror switch. And then join the black/white wires of both door harnesses to pin 9 on the JDM mirror switch.
How you wire it is up to you. Once thing that is a requirement, is to get some extra terminals/wire from a junk car to insert into the mirror switch harness. In the USDM car pin 9 and 10 are not populated. There is no other way to do this. You can find many Subarus or Nissans or Toyotas with similar mirror switch plugs or other harnesses similar to the mirror and mirror switch plugs, that you can harvest terminals from. Just clip them off, pay a couple bucks and you got a whole connector full of terminals with wire you can use for your wiring projects!
Here is a shot with the lock plate removed, you will need to take that out to slide a couple terminals in. Just pry it up with a small flat blade screwdriver.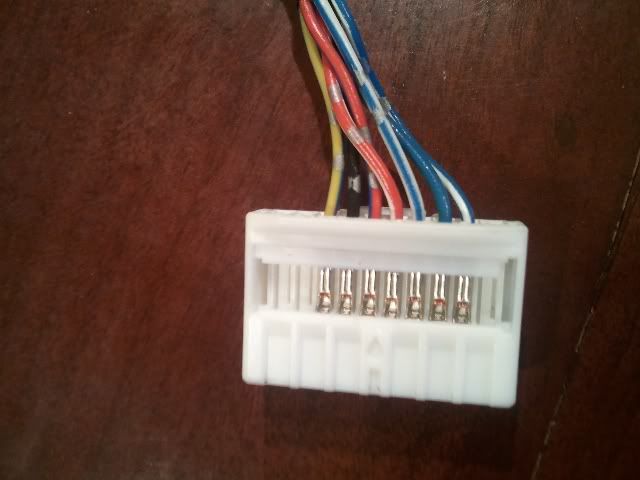
Refer to the Monkiboy's diagrams below for the slot numbers, but basically 9 and 10 are the two unpopulated slots next to each other above.
Here's where you wire it how you like, shown below are the wires I ran from each door harness to my "harvested" terminal wires. They are soldered and shrink wrapped. On the left side you can see my taps into the blue/red and black/white wires in the driver's door harness, I will plug into those with spade connectors crimped to the wires I ran.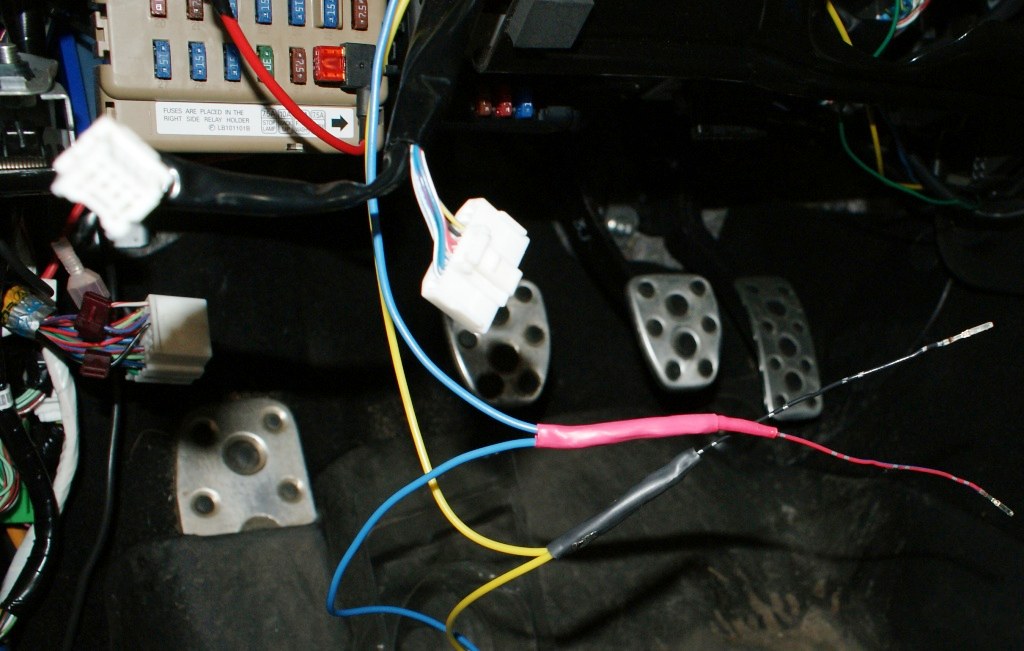
Now just slide the terminals into the mirror switch connector, make sure you slide the one wired to the blue/red wires into the pin 10 location, and the other one into pin 9. Slap the terminal lock back on, should look like this: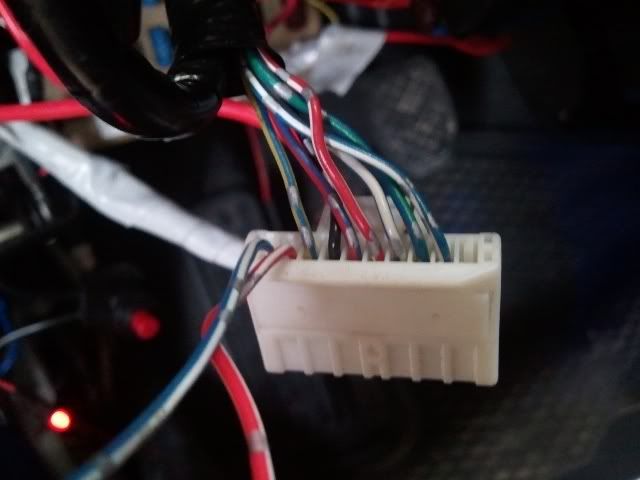
At this point, you should be able to plug in your JDM Mirror switch, and try it out! Hopefully it works for you, if not post up in this thread and we will try to help. Remember the key has to be "on" for this to work, the mirrors aren't powered with the car off.
If everything works, install the JDM switch in the panel, and put everything back together. Then go enjoy your new toy.
*bonus* if you are fancy and want your alarm to control these mirrors, here is how they work: The wire from pin-10 gets (+) and pin 9 is (-) and the mirrors fold out and stay there. The voltage is applied anytime the car is on. When you push the switch to fold them, the switch swaps pin 10 to (-) and pin 9 to (+) and the mirrors fold in and stay. If your alarm can control a swapping setup like that, or you can think up the relay setup to make that happen, you could set it up so the mirrors fold when you arm and unfold when you disarm.
Appendix A:
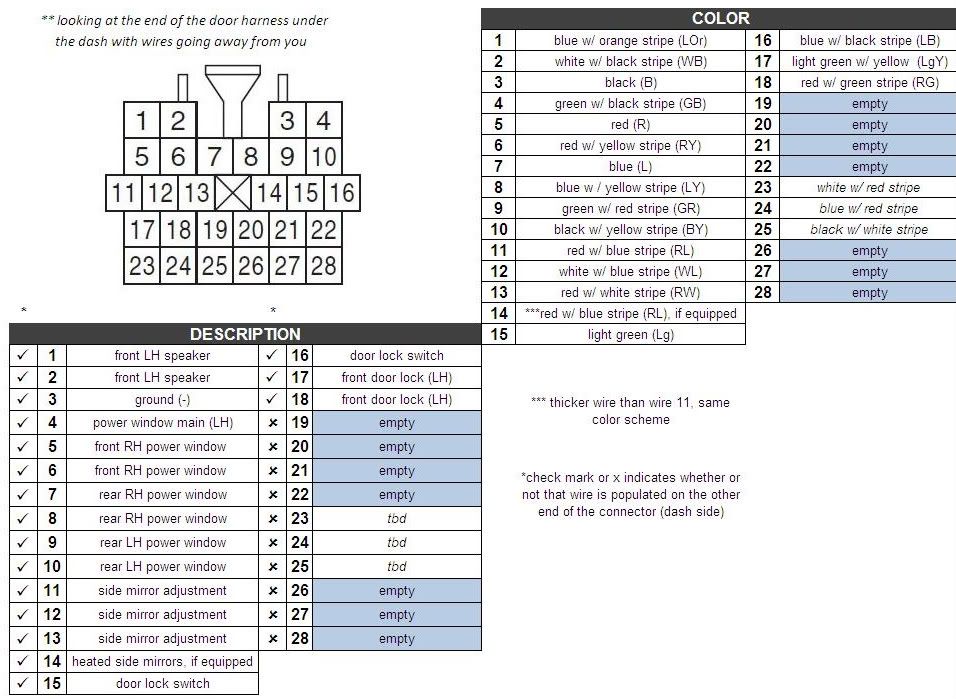
Here are some pinouts of the door plugs, mirror switch plug and mirror plugs. This is 08-09 Impreza/WRX/STI. 10-13 might be slightly different pins/colors.
Driver's side connector:
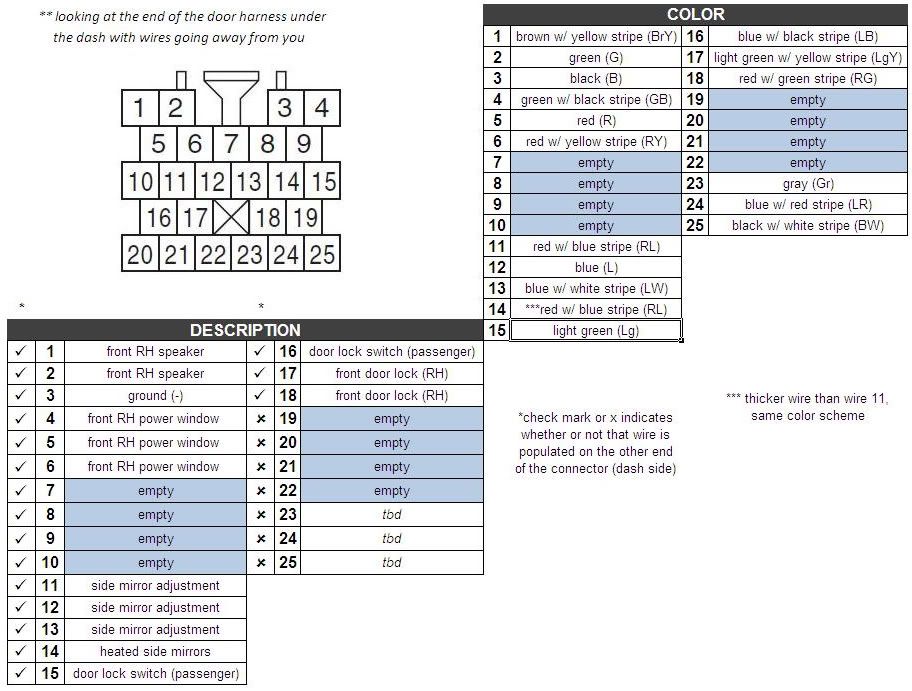
passenger's side connector:
 switch connector:
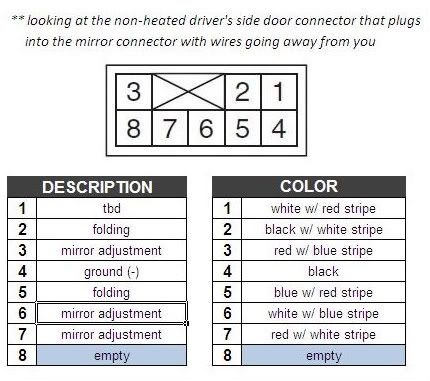
driver's side door to mirror connector:
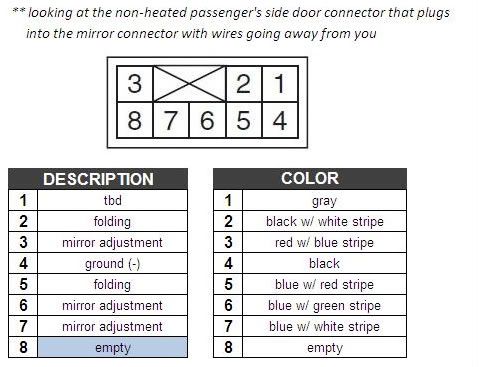
passenger's side door to mirror connector:
- Remove the signal unit (if applicable)
Take out the two smaller screws in this picture, the ones holding the signal unit in are pretty obvious. You will need to disconnect the plug for the signal wires when you pull it out.
- Release the terminals from the connector
- Release the terminals from the connector
At this point you will need to release the terminals from the connector. The plug won't pass through the base, so it has to be done.
This is the trickiest part. Before we get to that, you need to take the terminal locks off first. Release them on the left and right side clips and lift up. There is one on each row, top and bottom.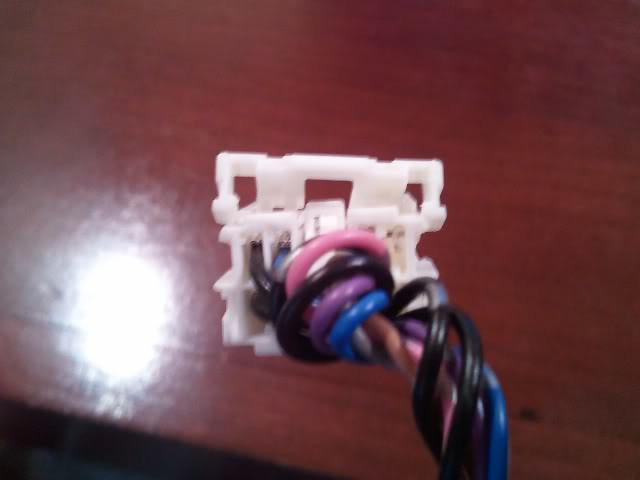
Here it is with the terminal locks removed: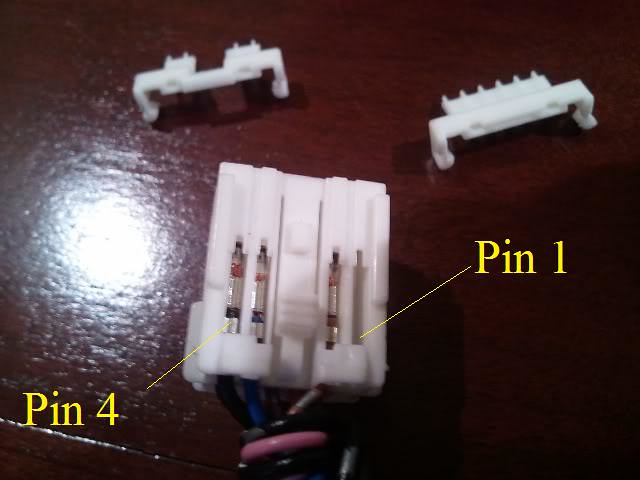
I labelled the ends of the first row with the terminal numbers above, so you can keep in mind the orientation of the terminals when reassembling.
*I reccomend you refer to the terminal map below in reassembly section, for the 8-slot or 10-slot connector, whatever came on your JDM mirrors, and note the wire color in each slot number as you release the terminals, for later reference. This is not required, I have found the wire colors are pretty standard, so we can get you back up and running. The stock mirrors on my WRX did have some non-standard colors compared to all the other mirrors I have seen so far. For this reason you might note the colors just in case. Subaru doesn't specify the wire colors on the mirror side, as it is serviced as a whole unit only, so there are no guarantees of standard colors.
To remove the terminals, you need to stick a small terminal release tool or jewelers screw driver in the front of the housing, towards the center side of the terminal you are working on, and bend down a latch that is holding the terminal in, and it will slide out. You'll have to figure out the technique as you go.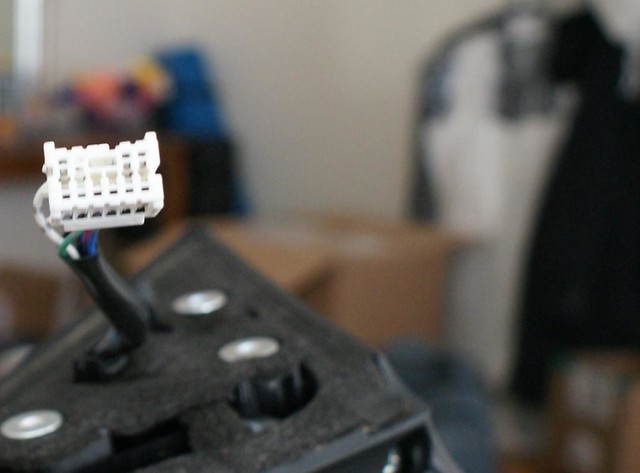
- Remove the base
Now you can finally remove the base. Most likely you will have two foam covers to remove, just be careful so you can reuse them. You'll be able to see all 3 screws.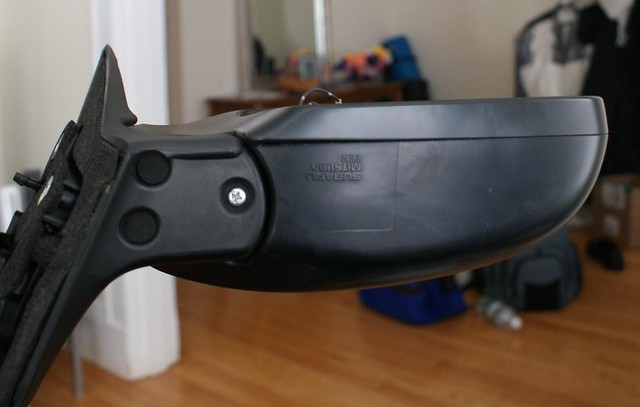
You need a good screw driver, a number 2 or number 3 Phillips to get these screws out. They are threadlocker'd from the factory, so they take some force. If you start to strip the head, try another driver.
After the base is dismounted, you will need to pull the wires through the passage in the base in order to seperate the mirror from it. There is a foam stuck on the base that is in the way. Carefully pull it back like so and you can slip the harness through. Picture shown after harness is removed. There is a small metal "retainer" to pull off when you pull the harness out, you will see what I mean when you are in there.
- Remove the power unit
Just a couple more trim pieces to remove first. To get the bottom trim off, take the screw in the lower center of this pic off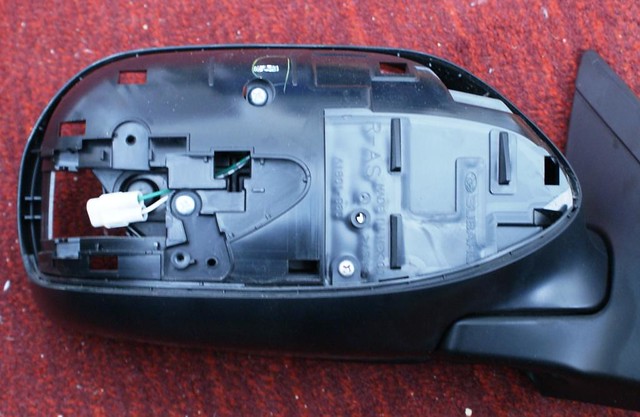
Then release this clip from the other side and you can snap the trim right off.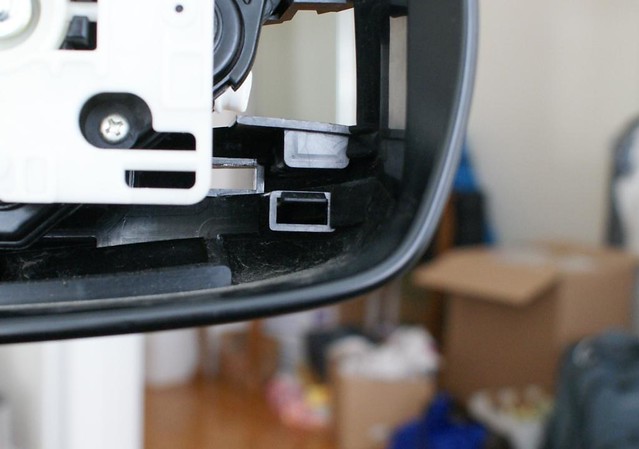
If you are disassembling a "passenger side" mirror (USDM Right, JDM Left) there is one small trim peice that has to come off as well. "Drivers side" mirrors won't have it.
Undo this screw from the front side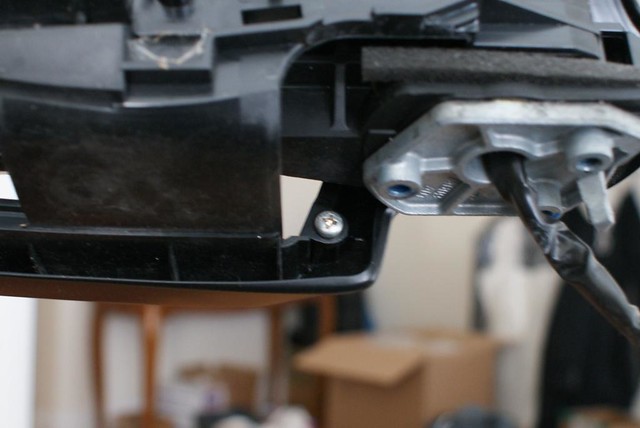
Then pull the little strip out from the other side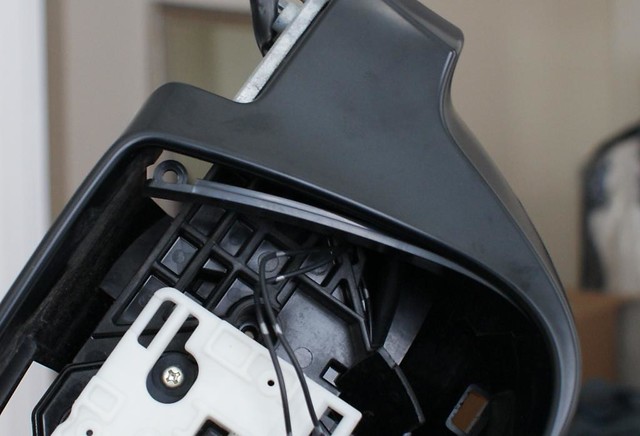
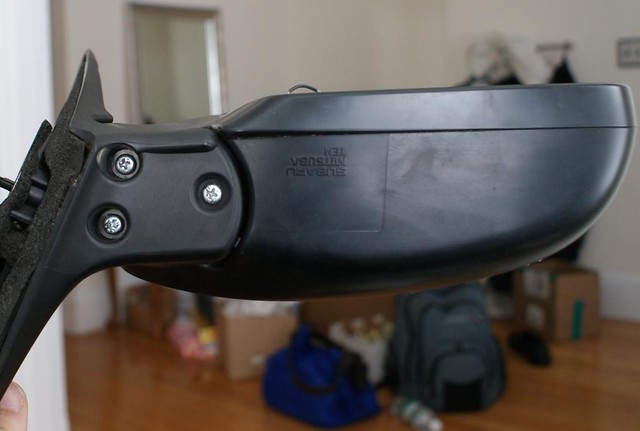
Finally you can take the power unit out, there are 5 screws IIRC, two on the back side, there is one very deep in there to the left of the white mirror mount plate not visible in the pic, don't miss it! Don't take those smaller screws behind the white mirror plate out, those don't mount the power unit, they hold it together.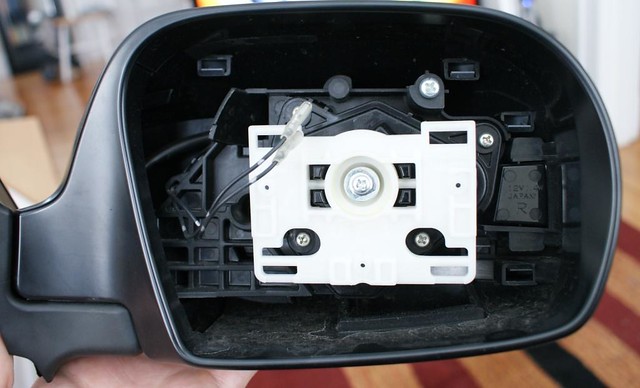
Two more on the backside visible here:
And one more on the bottom, at the top of this pic: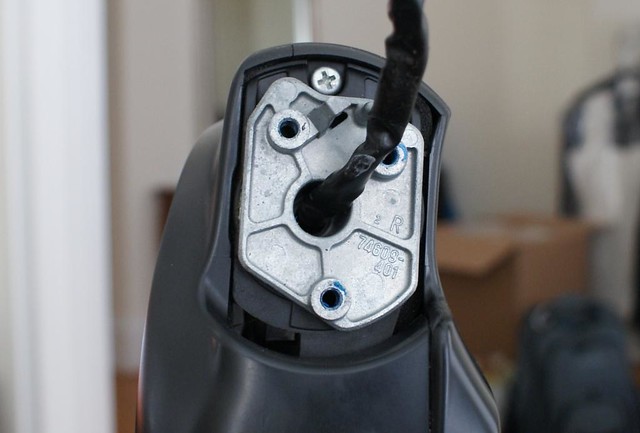
- Reassembly and mounting
Then release this clip from the other side and you can snap the trim right off.
If you are disassembling a "passenger side" mirror (USDM Right, JDM Left) there is one small trim peice that has to come off as well. "Drivers side" mirrors won't have it.
Undo this screw from the front side
Then pull the little strip out from the other side
Finally you can take the power unit out, there are 5 screws IIRC, two on the back side, there is one very deep in there to the left of the white mirror mount plate not visible in the pic, don't miss it! Don't take those smaller screws behind the white mirror plate out, those don't mount the power unit, they hold it together.
Two more on the backside visible here:
And one more on the bottom, at the top of this pic:
- Reassembly and mounting
If you got this far, you are already a pro at putting the mirrors back together. Just make sure you use your USDM mirror housings, otherwise all the other parts can be used interchangably when assembling your mirrors that will go on the car.
Below is are the terminal layouts for the mirror connector housing. When reassembling your mirrors, you want to snap the wire terminals into the correct slot, otherwise nothing will work right ;-) First the numbers, this is looking at the *back* of the mirror connector, where you will slide the terminals in. Premium(and Limited) WRXs have a different connector with 10 slots, vs. the Base WRX which will have a connector with 8 slots. The base door harness will have 7 wires run from the mirror inside the car, and the premium will have 9 wires run from the mirror plug inside the car.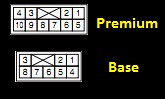
If you have a base WRX (no heated mirrors) read on, otherwise skip this paragraph so as not to pollute your mind ;-). To have full heat/signal/folding functions requires 9 wires and your plug only holds 8, of which 7 are already wired into the car in the stock door harness. You may have done the "signal mod" already, and run your own signal wires. At any rate, if you want it all, you are going to need to run a couple wires into the door. Strictly speaking, the base door harness supports power folding and signal, and those wires are run into the car. Some of the WRXs even have the signal wires live from the factory. Even if they don't, the "signal (-)" ground is already grounded, and you could use that wire for a signal (-) or a heat(-). That leaves 3 wires (signal (+), Fold (out) and Fold (in)) that are run into the car, that you can tap into. You can use them for whatever you want, ultimately it is a just a wire, that is run from the mirror plug, into the car at the door harness plug, but not connected to anything further. You can tap into it with whatever you like, just make sure the mirror side has the right wire for that function on the other side. This is where you get creative, and deviate from the wiring diagrams. I will include some door wiring help below for the 08-09 door wiring harness but do consult your own Service Manual for definitive info.
Ok, so base model concerns out of the way, you want to wire the mirror up to follow the wiring of the JDM model. Using the terminal number above, slide the terminals into the housing by color and function. If you noted colors like I suggested when you disassembled, you can just slide them back in like your notes say. If you are going from a 10-slot plug to an 8-slot for your base model WRX, you can use the wire colors and also your notes, to put the terminals into the proper location for your connector. Just map the color/function from the 10-wire to the color/function for the 8-wire below.
Base:
1 - Signal (+) (white)
2- Folding(out) (brown)
3- Common (blue)
4- Signal (-) (green)
5- Folding (in) (grey)
6- Up/down (pink)
7- Right/Left (purple)
8- **Unused**
Premium:
1 - Signal (+) (white)
2- Folding(out) (brown)
3- Common (blue)
4- Heat (black)
5- Signal (-) (green)
6- Folding (in) (grey)
7- Up/Down (pink)
8- Right/Left (purple)
9- **Unused**
10- Heat (black)
Note both heating wires are black. The heating element cares not about polarity so it doesn't matter which black wire goes into which slot as long as it is marked "heat" above.
Task 2 - Add the JDM switch and wire to the door harnesses. The wiring is already in the door harness from the factory. You only need to get the wires from the JDM switch, to the kick panels where the door harness enters the car.
*2011 only: The wires are in the driver's door harness, but missing from the passengers door harness. This means you can follow the procedure to tap the blue/red and black/white wires for the driver's side, but you will need to run your own wires from the mirror switch into the passenger's door and up to the mirror. They need to be run as below:
Wire from Pin 10 on the mirror switch to the grey (pin 5/6 as above) wire on the mirror in the door.
Wire from Pin 9 on the mirror switch to the brown (pin 2) wire on the mirror in the door.
If you wired up as I laid out above, pins 2 and 6 (2 and 5 for base) are your folding wires. Those will correspond to two wires already in each door harness. At this point you should have the mirrors mounted on the doors, and you can button them up, no more wiring needs to be done inside the doors.
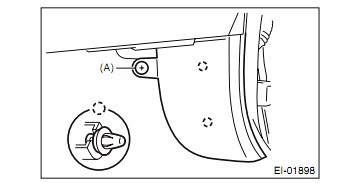
Now you need to remove the panel under the steering wheel:
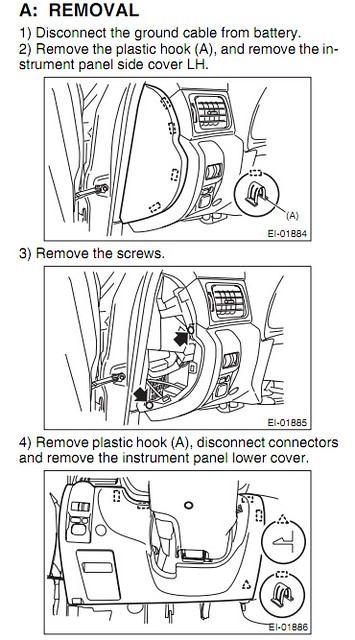
Disconnect the switches from the panel and set it aside.
Also remove the kick panel trim so you can get to the door plugs, do this on both the driver's and passenger's side:
Disconnect the switches from the panel and set it aside.
Also remove the kick panel trim so you can get to the door plugs, do this on both the driver's and passenger's side:
The kick panel is also held in by a tab under the sill trim, you will need to pull up the frontward snap of the sill trim to get the kick panel out.
Now you can get to the door plug/dash harness junction. It is behind where the kick panel was, held tight by a clip. you can slide the door plug down and of the clip holding it. It is easier to disconnect when you pull it off the clip. The lower plug is the door side, shown here:
You can see the two wires you want to tap into in this pic, the blue w/red stripe, and the black w/white.
The basics of what you want to do here:
Join the blue/red wires in both door harnesses to pin 10 on the JDM mirror switch. And then join the black/white wires of both door harnesses to pin 9 on the JDM mirror switch.
How you wire it is up to you. Once thing that is a requirement, is to get some extra terminals/wire from a junk car to insert into the mirror switch harness. In the USDM car pin 9 and 10 are not populated. There is no other way to do this. You can find many Subarus or Nissans or Toyotas with similar mirror switch plugs or other harnesses similar to the mirror and mirror switch plugs, that you can harvest terminals from. Just clip them off, pay a couple bucks and you got a whole connector full of terminals with wire you can use for your wiring projects!
Here is a shot with the lock plate removed, you will need to take that out to slide a couple terminals in. Just pry it up with a small flat blade screwdriver.
Refer to the Monkiboy's diagrams below for the slot numbers, but basically 9 and 10 are the two unpopulated slots next to each other above.
Here's where you wire it how you like, shown below are the wires I ran from each door harness to my "harvested" terminal wires. They are soldered and shrink wrapped. On the left side you can see my taps into the blue/red and black/white wires in the driver's door harness, I will plug into those with spade connectors crimped to the wires I ran.
Now just slide the terminals into the mirror switch connector, make sure you slide the one wired to the blue/red wires into the pin 10 location, and the other one into pin 9. Slap the terminal lock back on, should look like this:
At this point, you should be able to plug in your JDM Mirror switch, and try it out! Hopefully it works for you, if not post up in this thread and we will try to help. Remember the key has to be "on" for this to work, the mirrors aren't powered with the car off.
If everything works, install the JDM switch in the panel, and put everything back together. Then go enjoy your new toy.
*bonus* if you are fancy and want your alarm to control these mirrors, here is how they work: The wire from pin-10 gets (+) and pin 9 is (-) and the mirrors fold out and stay there. The voltage is applied anytime the car is on. When you push the switch to fold them, the switch swaps pin 10 to (-) and pin 9 to (+) and the mirrors fold in and stay. If your alarm can control a swapping setup like that, or you can think up the relay setup to make that happen, you could set it up so the mirrors fold when you arm and unfold when you disarm.
Appendix A:
Here are some pinouts of the door plugs, mirror switch plug and mirror plugs. This is 08-09 Impreza/WRX/STI. 10-13 might be slightly different pins/colors.
Driver's side connector:
passenger's side connector:
switch connector:driver's side door to mirror connector:
passenger's side door to mirror connector:
No comments:
Post a Comment